
How to Install Greenhouse Plastic on Metal and Wood Frames
Quick answer: To install greenhouse plastic, first measure between the final attachment points, confirm the film orientation, protect every frame-contact surface and install the channels or battens. In dry, calm conditions, pull the film over the frame, center it, secure temporary points, remove slack evenly and complete the perimeter fastening before cutting doors, vents or final edges.
The three main risks are: wind taking control of an unsecured sheet, abrasion or heat at frame-contact points, and excessive or uneven tension around channels, corners and openings. Metal hoop houses commonly use compatible lock channel and spring wire. Wood frames can use the same system or smooth continuous battens that spread the load.
Correct installation is a controlled sequence: measure, protect, position, temporarily secure, tension, fasten and inspect. The film should be taut enough to resist repeated flapping but not so tight that it stretches, whitens or tears around channels, corners and openings.
This guide covers flexible greenhouse film on metal, wood and selected PVC frames. It also explains end walls, roll-up sides and inflated double-layer systems. It does not cover rigid polycarbonate-panel installation or the structural engineering required to anchor a greenhouse against wind and snow. Channel spacing, screw schedules, structural loads, fastening-system design and blower sizing must be confirmed by the greenhouse, hardware or equipment manufacturer. The film supplier is responsible for the film specification, orientation, folding method, contact compatibility and warranty conditions.
Use this guide in three passes: calculate the sheet size and confirm the film before opening the roll; follow the 11-step installation sequence while the sheet is unsecured; then use the final inspection checklist before trimming. If the greenhouse or fastening-system manual conflicts with a general step below, the project-specific manual controls.
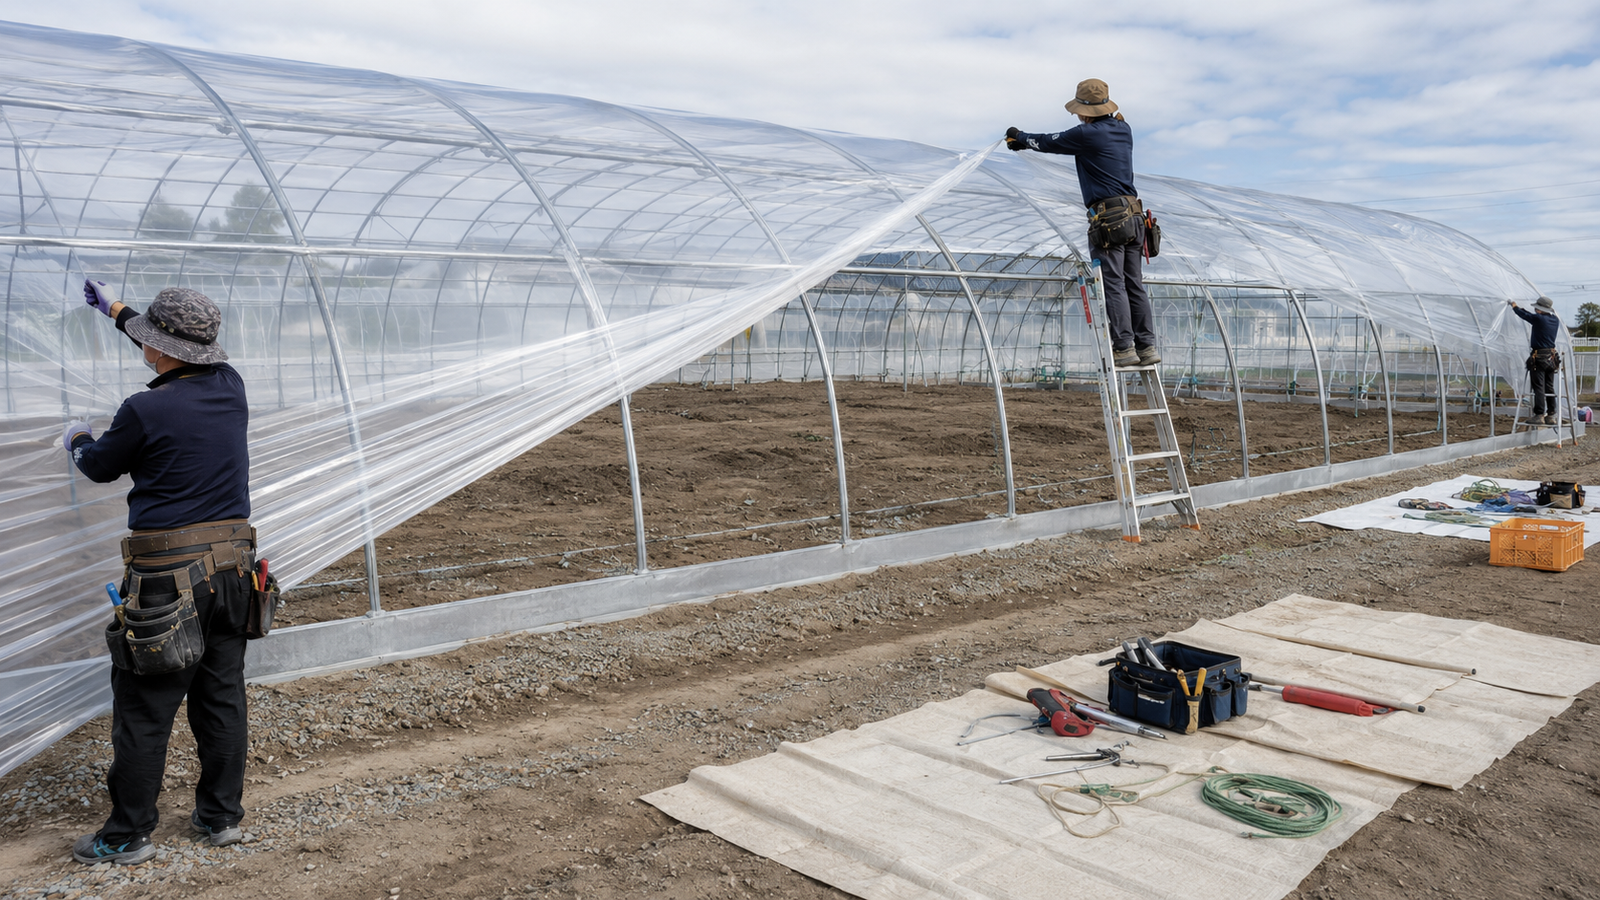
A crew pulls clear greenhouse plastic over a commercial metal hoop house in calm conditions.
Contents
- Detailed installation sequence
- Installation responsibility matrix
- Measure the greenhouse plastic
- Choose the fastening method
- Prepare the frame
- Follow the installation steps
- Attach film to metal, wood or PVC frames
- Check film tension and finish openings
- Install a double-layer system
- Diagnose installation problems
- Complete the final inspection
- Reinspect after installation
- Read the FAQs
- About the author
Quick Answer: How Do You Install Greenhouse Plastic?
The following sequence summarizes how to install greenhouse plastic on a typical flexible-film structure:
- Confirm that the greenhouse structure is complete, square, braced and anchored according to its design.
- Measure between the final film attachment points, not only across the ground footprint.
- Check the roll label, fold, printed markings and required inner or outer surface.
- Smooth and protect every frame contact point, bolt head, channel end and sharp edge.
- Install lock channels, baseboards and opening frames before lifting the film.
- Choose a dry, calm installation period and organize enough people and equipment for the roll size.
- Unroll the film on a clean surface and pull it over the frame without dragging it across the ground or sharp hardware.
- Center the sheet and secure a few temporary points so a gust cannot lift it.
- Remove slack evenly and fasten the film using the correct system for the frame.
- Complete the end walls, doors, vents and roll-up sides before final trimming.
- Inspect the complete cover for abrasion, wrinkles, concentrated stress and loose edges.
The exact film allowance, fastener spacing, installation temperature and inflation setting depend on the film, greenhouse and attachment system. Use this guide to understand the process, then follow the product and structure manufacturers' instructions for project-specific values.
Installation Responsibility Matrix Before Work Starts
A common commercial-project mistake is allowing the installer, film supplier and greenhouse contractor to assume that another party confirmed the critical details. Assign these checks before the roll is opened.
| Decision | Primary confirmation | Evidence to keep | Why it matters |
|---|---|---|---|
| Structure, anchoring and load design | Greenhouse manufacturer, contractor or qualified designer | Approved drawing and structure manual | The film is a covering, not a substitute for structural design. |
| Film grade, dimensions, orientation and contact restrictions | Film supplier and buyer | Order specification, TDS, roll label and packing instructions | Prevents wrong size, reversed functional layers and warranty conflicts. |
| Channel, wire, clips, battens and fastening sequence | Fastening-system supplier and installer | Hardware manual and approved installation detail | Controls grip, adjustment, channel capacity and concentrated stress. |
| Site conditions, crew, access and work-at-height controls | Installer or site contractor | Installation plan, weather check and safety record | Reduces loss of control, falls and damage while the sheet is unsecured. |
| Completed installation and batch traceability | Installer and buyer | Inspection checklist, photos, roll number and installation date | Supports maintenance, troubleshooting and any later claim review. |
Before You Start: Confirm the Covering System
This guide is for flexible greenhouse film
The word "plastic" can describe several different greenhouse coverings. Their installation methods are not interchangeable.
| Covering | Form | Typical attachment |
|---|---|---|
| Greenhouse-grade polyethylene film | Flexible roll | Lock channel and spring wire, continuous battens or a compatible film-fastening system |
| Reinforced or woven greenhouse film | Flexible reinforced sheet | Manufacturer-approved channels, battens or fasteners |
| Multiwall polycarbonate | Rigid panel | Profiles, screws, washers, closure tape and expansion allowance |
| Temporary construction sheeting | Flexible sheet | Temporary protection only unless specifically rated for agricultural outdoor use |
If the frame was designed for rigid panels, do not substitute flexible film without checking attachment points, bracing and ventilation. If the frame was designed for flexible film, do not use a polycarbonate-panel installation guide.
For help choosing between flexible film and rigid panels, see the greenhouse covering material comparison. For flexible-film thickness and mil-to-micron conversion, use the greenhouse plastic thickness guide.
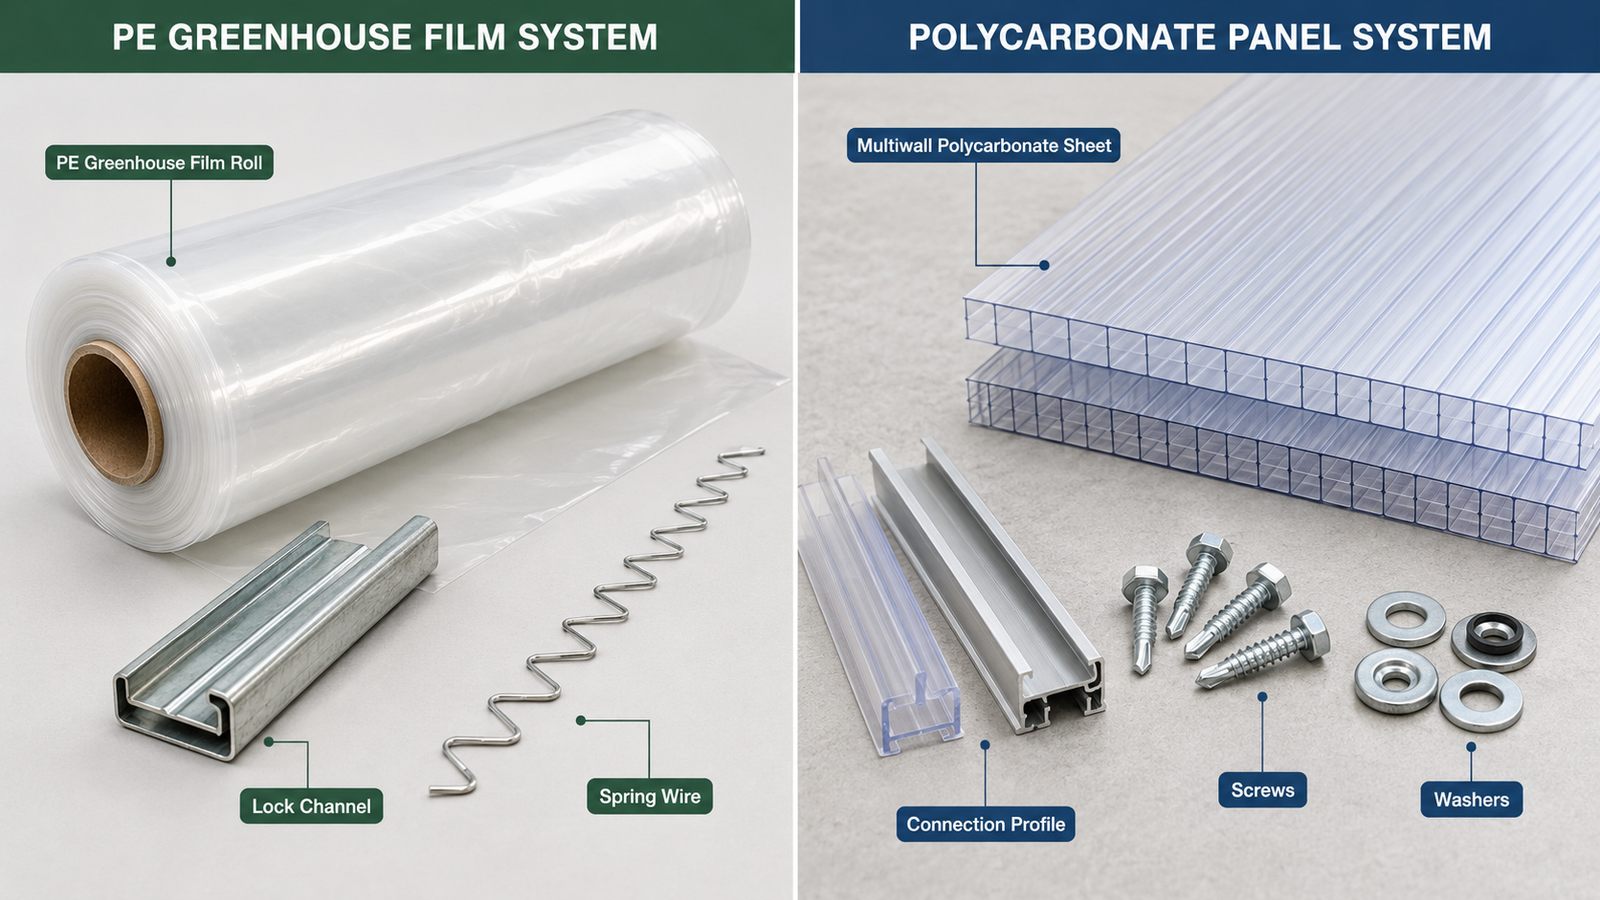
Flexible greenhouse film and rigid polycarbonate panels require different attachment systems.
Decide between a single and double layer before ordering
A single layer is common on high tunnels and simplifies installation. Penn State Extension distinguishes the single greenhouse-grade polyethylene layer commonly used on high tunnels from the inflated double-poly system often used on greenhouses.
An inflated double layer is not simply a second sheet placed loosely over the first. It requires:
- Compatible inner and outer films
- A perimeter fastening and sealing plan
- Enough channel capacity for the selected layers
- A blower and outside-air inlet
- A way to regulate and verify the air pressure
- Access for inspection and repair
Choose the system before calculating film quantity or installing channels.
Confirm which side faces in and which side faces out
Do not assume that every roll uses the same orientation rule.
Before cutting:
- Read the roll-core label and packaging instructions.
- Find the printed edge, layer markings or installation arrows.
- Confirm whether the film has an anti-drip, anti-condensate, IR, diffusion or other directional layer.
- Check how the roll was folded and which direction it should unfold.
- Ask the supplier before installation if the markings are missing or unclear.
Some products are symmetrical. Others are multi-layer films with a specific greenhouse-interior surface. A film can still cover the structure when reversed, but a directional function may not perform as intended.
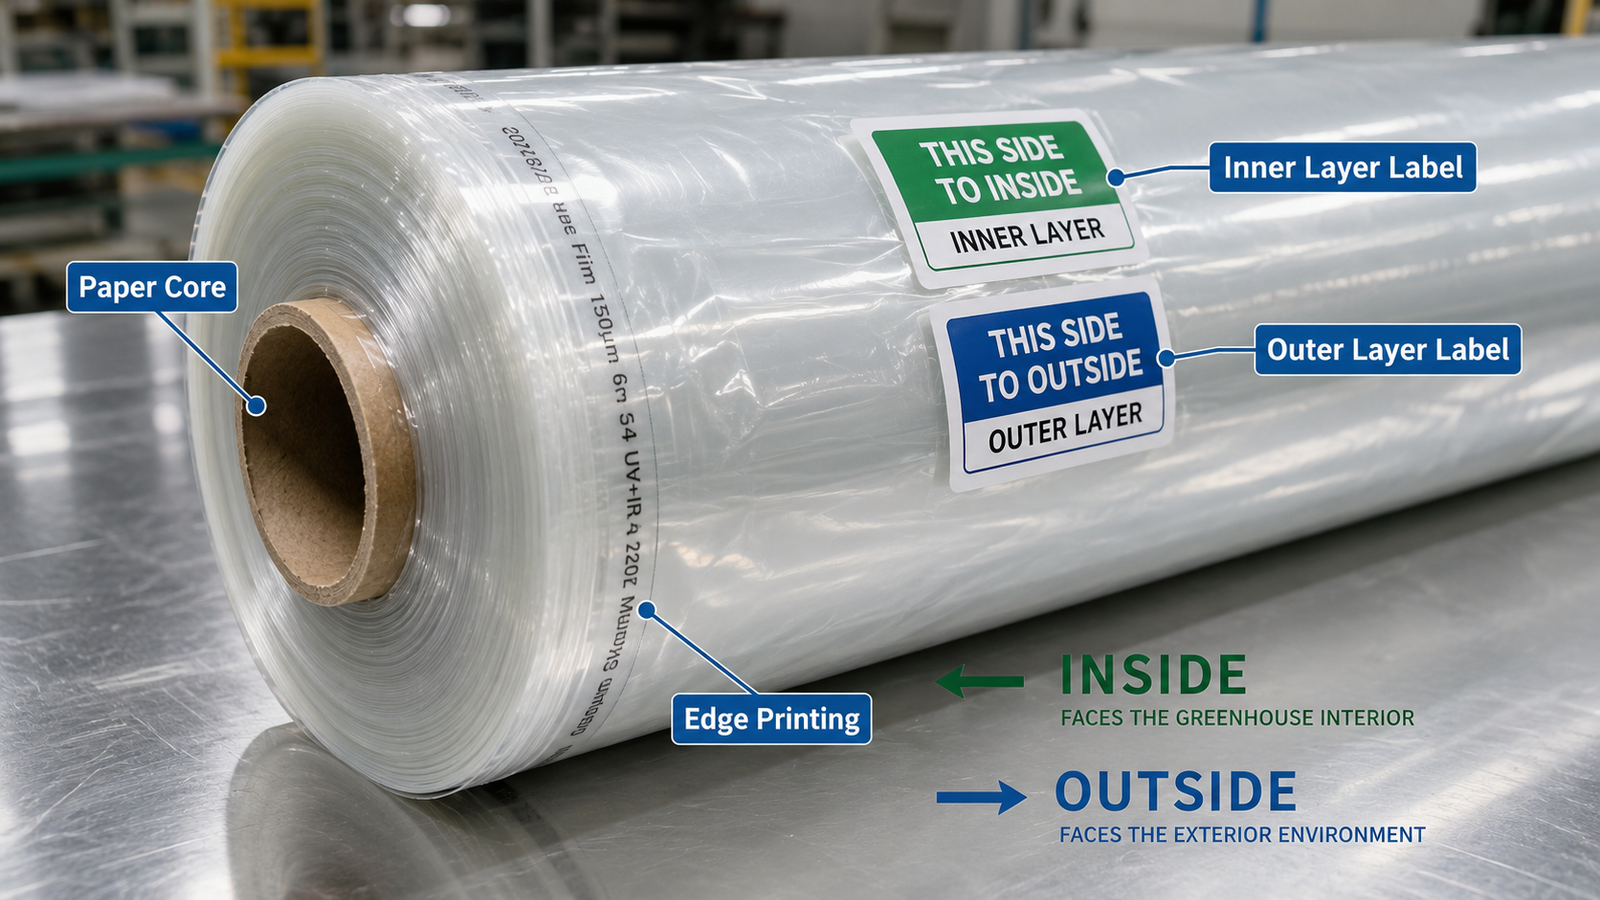
Use the roll-core label, edge printing or product instructions to identify the film orientation.
Handle, Store, Unfold and Cut the Film
Understanding how to install greenhouse plastic also means protecting the roll before it reaches the frame. Keep the original packaging, product label, batch number and roll number until installation is complete. These records also help trace shipping, dimensional or product-quality concerns.
Handling and storage
- Do not drop a roll or press forklift tips into the film or packaging.
- Support the roll during forklift handling. For lifting, use wide slings that distribute the load rather than wire rope directly around the roll.
- Do not drag a roll across gravel, rough concrete or exposed hardware.
- Store unopened rolls in a cool, dry, ventilated and shaded location.
- Keep the film away from heat, flame, welding, solvents, paint, pesticides, fumigants and other chemicals that may affect its formulation.
- Follow the supplier's stacking instructions and avoid long-term point loading that can deform the roll.
Confirm the fold before unfolding
Wide greenhouse film may be center-folded, double-folded, multi-folded or supplied as tube film. A center-folded sheet is generally unrolled along the greenhouse length and opened from the centerline toward both sides. Double- and multi-folded film should be opened in the sequence of the folds; do not pull hard on a trapped inner fold. Before cutting tube film, confirm the specified slit line and intended finished width.
Stop and contact the supplier if the packaging instructions, label and actual fold do not agree. Forcing the roll open can reverse a directional film, damage a folded edge or lead to a cutting error.
Check before cutting
- Recheck the dimensions between final attachment points, the inside/outside orientation, fold direction and working allowance.
- Cut on a clean, smooth surface free from gravel, splinters and metal fragments.
- Use clean safety cutters, scissors or a dedicated film knife. Do not push a blade deeply through multiple folded layers.
- Keep cut edges straight and avoid V-shaped notches that can initiate a tear.
- Round the corners of openings for doors, fans or shutters rather than leaving sharp inside corners.
- Measure and cut end-wall film for the actual end-wall system instead of assuming that the roof sheet should wrap every end-wall detail.
These are general roll-protection principles. Product-specific storage limits, contact restrictions, stacking and cutting instructions must come from the label, current technical data sheet and written supplier guidance.
How Much Greenhouse Plastic Do You Need?
When planning how to install greenhouse plastic, ordering by the greenhouse's ground width alone is a common measuring error. The roof film must travel over the outside of the bows or rafters and reach the actual attachment points.
Measure the roof-film width
Use a flexible measuring tape or a non-stretch rope:
- Start at the final attachment point on one side.
- Follow the outside surface of the frame over the roof.
- Continue to the final attachment point on the opposite side.
- Mark the rope and measure it on a flat surface.
- Add the working and fastening allowance required by the chosen system.
Use this project formula:
Required film width = measured distance over the frame between final attachment points + fastening and handling allowance
The allowance is system-specific. A fixed number copied from a different greenhouse may be too short for roll-up sides or unnecessarily wasteful for a simple baseboard attachment.
Measure the roof-film length
Measure the full greenhouse length between the end frames, then add the allowance needed to pull, hold and attach the sheet at both ends:
Required film length = greenhouse length + allowance at end A + allowance at end B
Do not trim the roof sheet to the exact frame length before installation. The crew needs material to grip, center and secure.
Measure end walls separately
Roof-film offcuts do not automatically provide enough material for both end walls. Calculate:
- End-wall width and height
- Door and vent locations
- Film overlap at the perimeter
- The layout direction of any directional film
- Whether one sheet or several framed sections will be used
Include roll-up sides in the calculation
For roll-up ventilation, the plastic must reach the roll bar when the side is fully closed and remain compatible with the upper attachment rail. Measure the actual drop and follow the roll-up hardware instructions. Do not estimate this dimension from a photograph of another greenhouse.
| Measurement | Project value |
|---|---|
| Distance over bows between final side attachment points | ______ |
| Greenhouse length | ______ |
| Required side allowance | ______ |
| Required end allowance | ______ |
| End-wall film pieces | ______ |
| Roll-up side drop and roll-bar allowance | ______ |
| Number of roof layers | ______ |
| Final roll width, length and quantity | ______ |
The measured roof arc is a sound starting point; the added allowance must come from the actual fastening and ventilation design. If the roof needs more than one sheet, use a joint, profile or sealing system designed for that greenhouse. Ordinary tape is not a substitute for an engineered roof-film seam.
Calculate before you order: enter the measured fixing-point-to-fixing-point path, side drops and project allowances in the greenhouse film width calculator. Treat its result as an RFQ starting point; the supplier must still confirm the producible width, folding method and final allowance for the selected fastening system.
Ordering a correctly sized continuous sheet can reduce field seams, installation time and leak-prone transitions. After measuring, review the available custom greenhouse plastic roll specifications before placing the order.
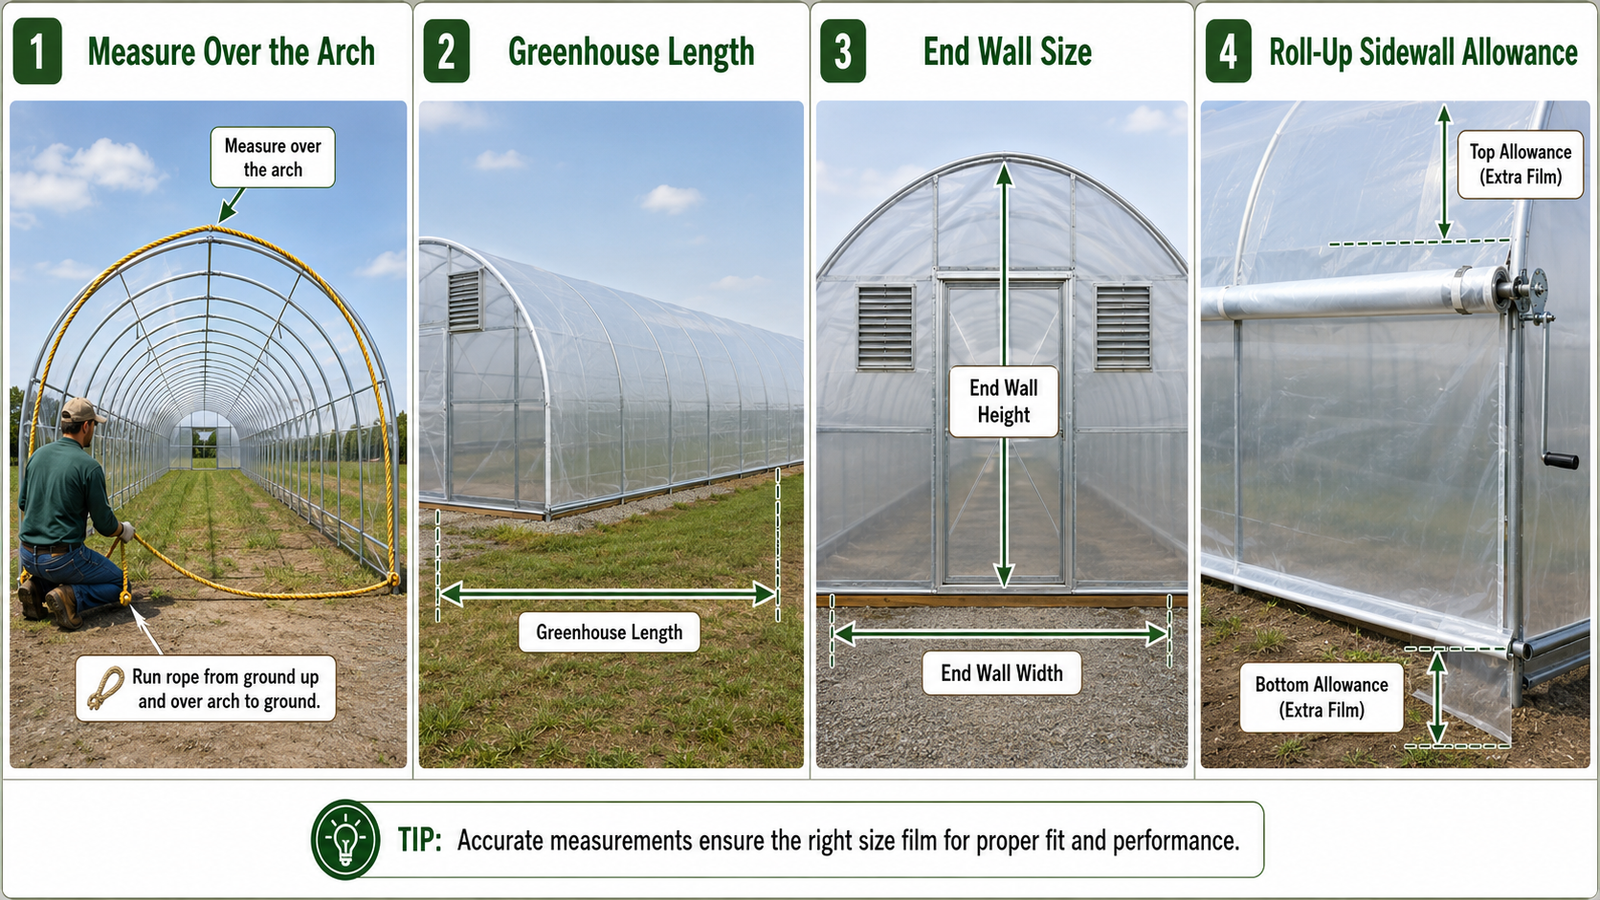
Measure the roof arc, greenhouse length, end walls and roll-up sides separately.
Tools, Hardware and Crew
Prepare the work area before opening the roll. Leaving a large sheet unsecured while someone searches for screws or wire is an avoidable risk.
Basic tools
- Measuring tape and marked non-stretch rope
- Film-safe utility knife or sharp scissors
- Clean pull ropes
- Soft-bristled brooms or protected poles
- Drill and the fasteners specified for the channel or frame
- Bolt cutters or a suitable wire-cutting tool
- Gloves and eye protection
- Stable ladders, work platforms or lifting equipment suitable for the height
- Greenhouse repair tape for accidental small punctures
- Camera or phone for installation records
Fastening materials
Depending on the structure:
- Lock channel and compatible spring wire
- Double lock channel
- Continuous wood or polymer battens
- Matched snap clips or clamps
- Roll bar, couplers and roll-up-side hardware
- Anti-billow rope or strapping where the system specifies it
- Frame-contact or anti-hot-spot tape approved for the film
Crew size
There is no universal crew number. A short hobby structure and a wide commercial tunnel do not present the same handling risk.
Crew planning should consider:
- Film width and roll weight
- Greenhouse length and height
- Roll folding method
- Whether the film is pulled over the side or along the ridge
- Wind exposure
- Access equipment
- Single- or double-layer construction
University and supplier guides commonly show several people controlling corners, edges and pull ropes. The practical requirement is enough trained hands to keep the film supported, centered and under control at every stage.
Work-at-height safety
Use ladders and access equipment only for their intended purpose. OSHA ladder guidance advises inspecting ladders before use, keeping the area around the top and bottom clear and positioning the equipment so it cannot slip. Do not climb greenhouse cross-bracing or stand on a film-covered frame as an improvised work platform.
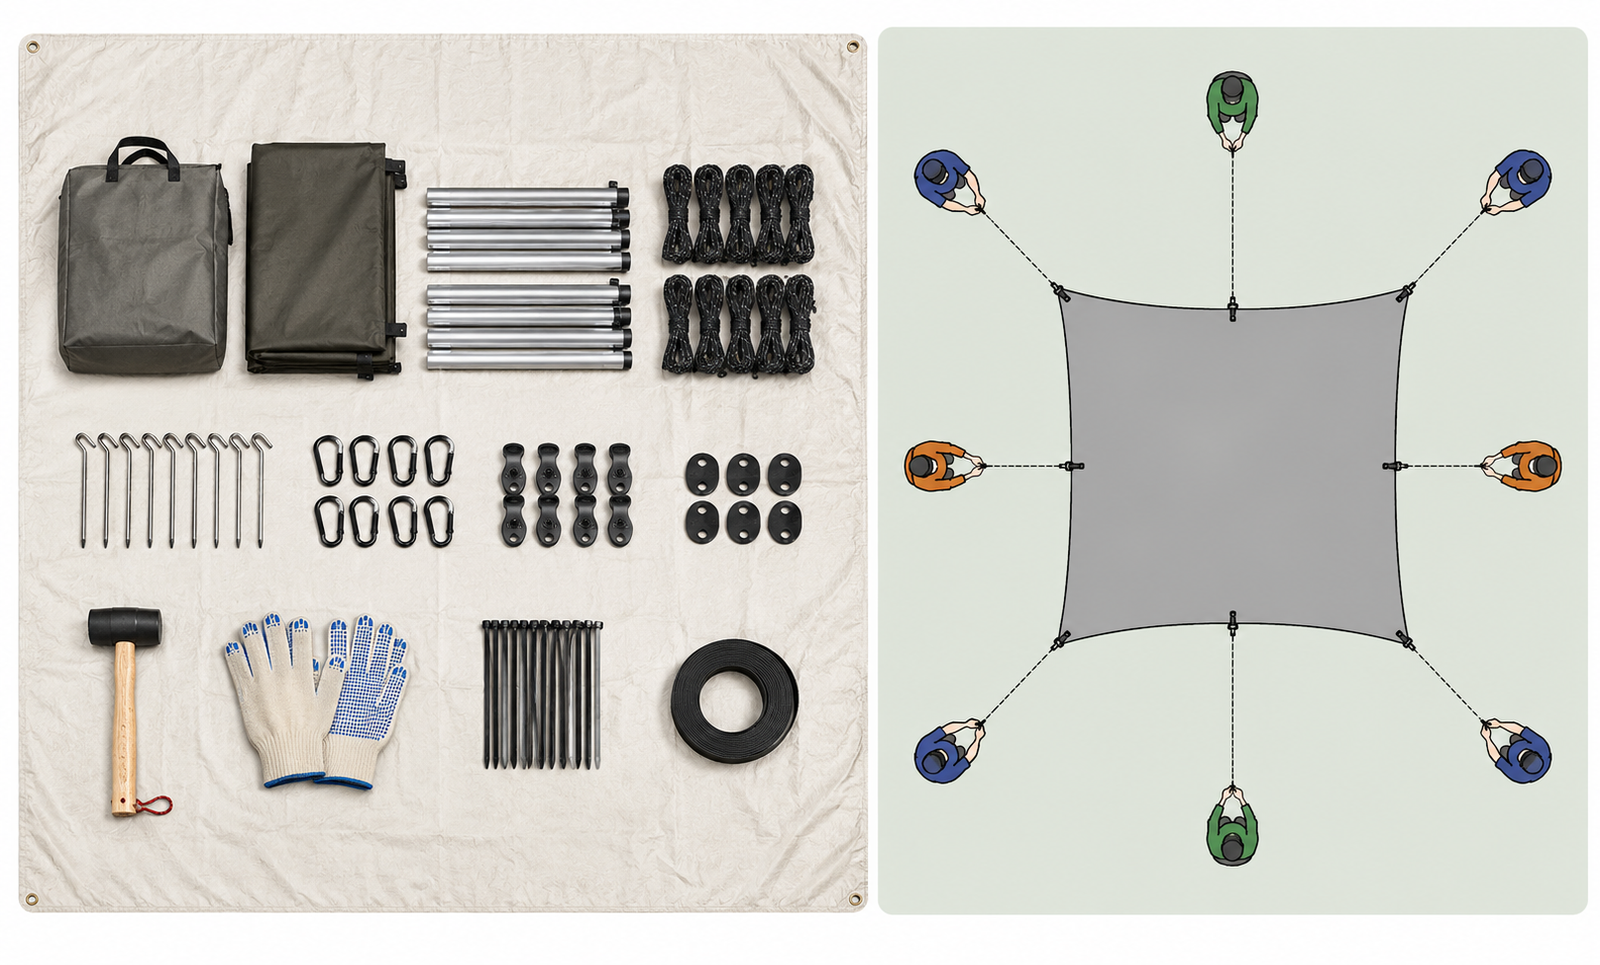
Prepare the tools, fastening hardware and crew positions before opening the roll.
Choose the Right Greenhouse Plastic Fasteners
The best fastener is not simply the one with the highest grip. It must suit the frame, film, load path, need for adjustment and expected replacement schedule.
| Fastening method | Common frame or location | Best use | Main advantage | Main limitation |
|---|---|---|---|---|
| Lock channel and spring wire | Metal or wood | Permanent or semi-permanent roof edges, end frames and openings | Continuous, adjustable grip without fastening through the main sheet | Channel, wire and layer capacity must match |
| Double lock channel | Metal or wood | Separate roof, end-wall, shade or multiple-film attachment paths | Organizes overlapping materials | More hardware and planning |
| Continuous battens | Wood and selected framed edges | Roof perimeter or end-wall film | Spreads load along an edge | Poor detailing can pierce or concentrate stress |
| Snap clips or clamps | Matched round pipe | Small structures, temporary covers and specified sidewall uses | Fast and reusable | Pipe diameter and load rating limit use |
| Rope or anti-billow system | Selected hoop-house systems | Secondary restraint or specified primary system | Controls billowing between support points | Not a universal substitute for perimeter fastening |
Lock channel and spring wire
Spring wire is also called wiggle wire, zig-zag wire or wire lock. The channel is fixed to the frame first. The film lies over the open channel, and the spring wire is worked into the track to hold it continuously.
This system is widely used because the film can often be released, adjusted and resecured without driving individual fasteners through the main sheet. The channel may be installed on metal or wood when the hardware and substrate are compatible.
Check:
- Channel material and profile
- Compatible spring-wire size and coating
- Number of film or fabric layers the channel can hold
- Fastener type and spacing specified by the channel manufacturer
- Safe treatment of channel joints and cut ends
Continuous battens
A batten strip traps the film against a frame member and distributes the clamping force. It can be effective on wood frames and selected end-wall details.
The batten must be:
- Smooth and free from splinters
- Continuous enough to spread the load
- Fastened into sound framing
- Detailed so screw heads, nails or strip edges do not cut the film
- Removable without destroying large areas of the sheet
Bare staples driven directly through unsupported film create concentrated loads. They should not be presented as the default permanent solution for a large exposed roof.
Greenhouse plastic clips
Clips are useful only when they match the pipe outside diameter and the intended load. Small clips may be appropriate for temporary sheets, low tunnels, interior partitions or specific roll-up systems. That does not automatically make them suitable as the only permanent attachment for a large wind-exposed greenhouse roof.
Ask the clip supplier for:
- Compatible pipe diameter and shape
- UV and outdoor-use rating
- Film thickness range
- Recommended spacing
- Permanent, seasonal or temporary use classification
- Wind-load or system limitations
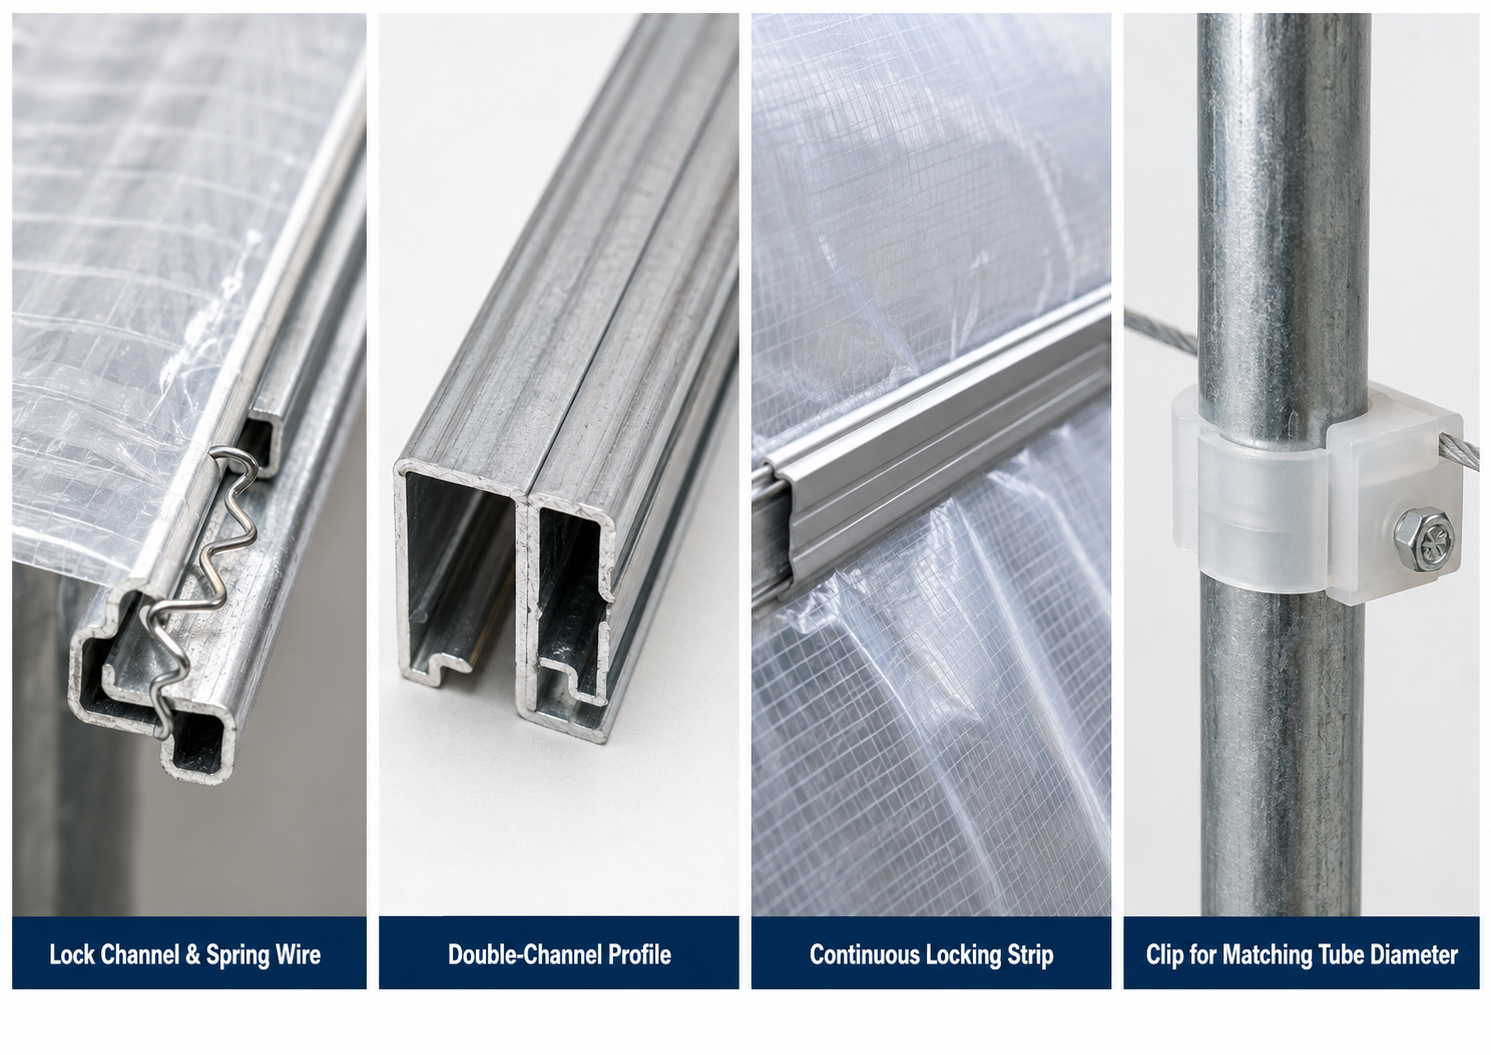
Common fastening systems include lock channel with spring wire, continuous battens and matched clips.
Prepare the Frame Before Pulling the Film
Installation quality begins before the film leaves the roll.
Confirm the structure is ready
The greenhouse should be:
- Complete and braced
- Square and aligned
- Anchored according to its engineered or kit design
- Fitted with baseboards, hip rails and opening frames
- Clear of unfinished welding, drilling or cutting work
The film is a covering, not a structural anchoring system. USDA NRCS guidance emphasizes following the greenhouse manufacturer's recommendations and selecting a system designed for the expected wind and snow loads.
Inspect every film-contact surface
Run a careful visual and gloved-hand inspection over:
- Bows and rafters
- Purlins
- End-frame arches
- Ridge members
- Baseboards and hip rails
- Bolt heads and screw tips
- Welds, burrs and cut tube ends
- Channel joints
- Door, vent and fan frames
The University of Connecticut identifies attachment stress, abrasion, sharp surfaces and heat buildup around rafters, purlins and extrusions as causes of early film failure. Pressure-treated lumber and chemicals used inside the greenhouse can also affect polyethylene.
Correct the cause rather than asking a thicker film to absorb repeated damage.
Protect hot or abrasive contact points
Use a film-compatible contact tape, smooth protective surface or coating when specified by the film or greenhouse manufacturer. Light-colored contact surfaces may reduce localized heating, but the tape, paint, wood treatment or adhesive must be compatible with the film and its warranty.
Do not cover an exposed sharp edge with a thin strip of ordinary tape and assume the problem is solved. Round, deburr or shield the edge first.
Install channels before the roof film
Fit the main attachment hardware in advance:
- Side and base channels
- End-frame channels
- Door, fan and vent perimeter channels
- Roll-up-side upper rail
- Double-channel locations
Smooth every cut channel end and keep the wire sections within reach. The crew should be able to secure the film immediately after it is centered.
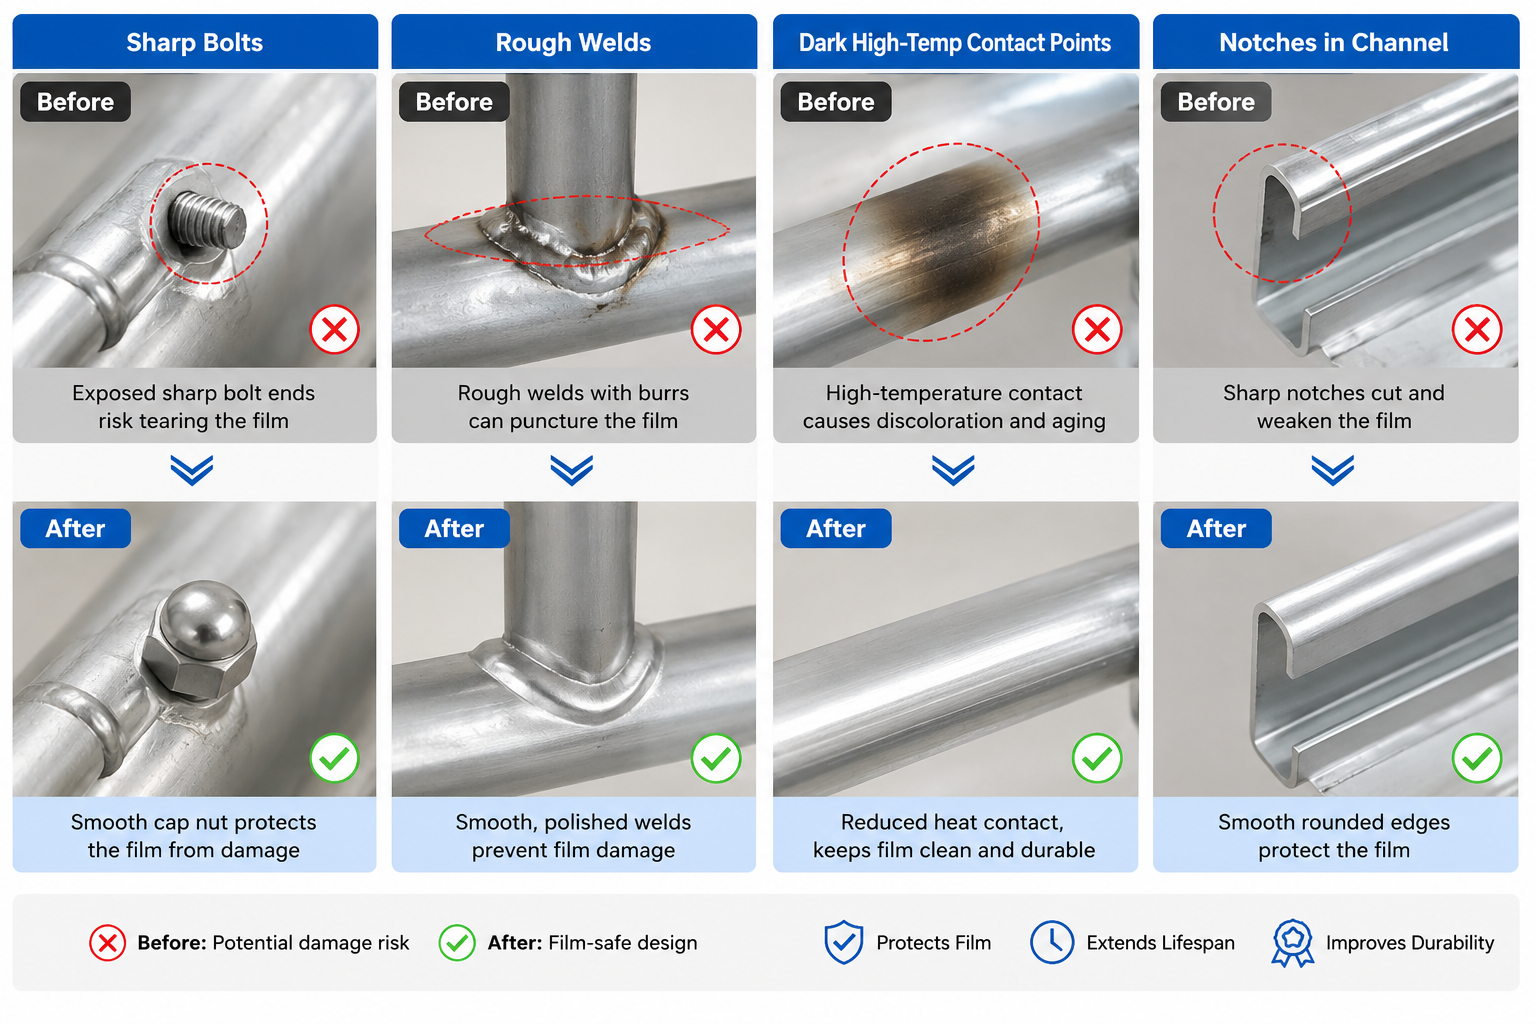
Remove sharp edges, rough welds and exposed fasteners before the film touches the frame.
What Conditions Are Best for Installation?
Avoid wind
The most consistent advice across university and installer resources is to avoid covering a greenhouse on a windy day. A large film sheet can become a sail, pull workers off balance, drag across hardware or tear before it is secured.
As one product-specific benchmark, ACF Greenhouses recommends installation when wind is below 5 mph (about 8 km/h) and the temperature is 59–70°F (15–21°C). Do not treat those figures as a universal engineering limit: the film, structure, access equipment and installer's risk assessment may require a narrower range. Stop the installation whenever gusts prevent the crew from controlling the full sheet.
Keep the film and work surface dry and clean
Wet film is slippery and harder to handle. Dirt, gravel and metal cuttings can puncture it while the roll is unfolded. Use a clean tarp or prepared surface rather than dragging the film over bare ground.
Follow the film manufacturer's temperature guidance
Polyethylene expands as it warms and contracts as it cools. This is why installation advice sometimes appears contradictory: one source recommends a cooler morning, while another recommends a warm, calm period.
The correct choice depends on:
- Film formulation
- Current film temperature
- Expected temperature change after installation
- Greenhouse size
- Single- or double-layer construction
- Fastening system
- Manufacturer tension guidance
Use the approved temperature range for the supplied film. Whatever the temperature, avoid extreme heat, freezing handling conditions and rapid weather changes that prevent controlled tensioning. Record the approximate air temperature and weather at installation so later slack or stress can be assessed against the original conditions.
When to use a professional installer
Use a greenhouse contractor or qualified installation team for multi-span or gutter-connected greenhouses, very wide or heavy rolls, elevated work that requires lifting equipment, complex automated ventilation, or projects without a complete fastening plan. Structural changes require an appropriate design professional, and blower wiring must be completed by a qualified person under the applicable electrical rules.
Step-by-Step Greenhouse Plastic Installation
The sequence below shows how to install greenhouse plastic using a common flexible-film workflow. Adjust the pull direction, temporary attachment points and fastening order to the greenhouse manual.
Step 1: Lay out and inspect the roll
Move the film close to the greenhouse without opening it on dirty or sharp ground.
Before unfolding:
- Match the roll label to the order
- Confirm width, length and quantity
- Record the batch or roll number
- Identify the inside, outside and fold direction
- Inspect packaging for transit damage
- Confirm that the frame-contact surfaces and channels are complete
Do not use a knife deep inside the wrapping where it can cut the film.
Step 2: Position and unroll the film
Place the roll in the orientation required for the selected pulling method. Large films may be center-folded or gusseted to unfold from the ridge.
Keep the roll ends supported so they do not scrape the ground. If a pipe is placed through the core, protect the film edges from the supports.
Step 3: Attach pull ropes without puncturing the sheet
Use the method specified by the installer or film supplier. A common approach is to wrap the film around a smooth object before attaching a rope so the load is distributed rather than tied through a puncture.
Check that:
- Rope contact points are smooth
- Knots cannot cut the film
- Ropes are spaced to control the sheet
- Pullers can move together
- No rope crosses a sharp frame edge
Step 4: Pull the film over the structure
Pull steadily rather than in sudden jerks. Workers on the sides should help the folded sheet open and release snags while other workers control the leading edge.
Use only smooth, protected poles or soft brooms to lift the film over a joint. Do not push with an exposed metal tube, ladder tip or sharp tool.
If the film catches, stop. Pulling harder can turn a small snag into a long tear.
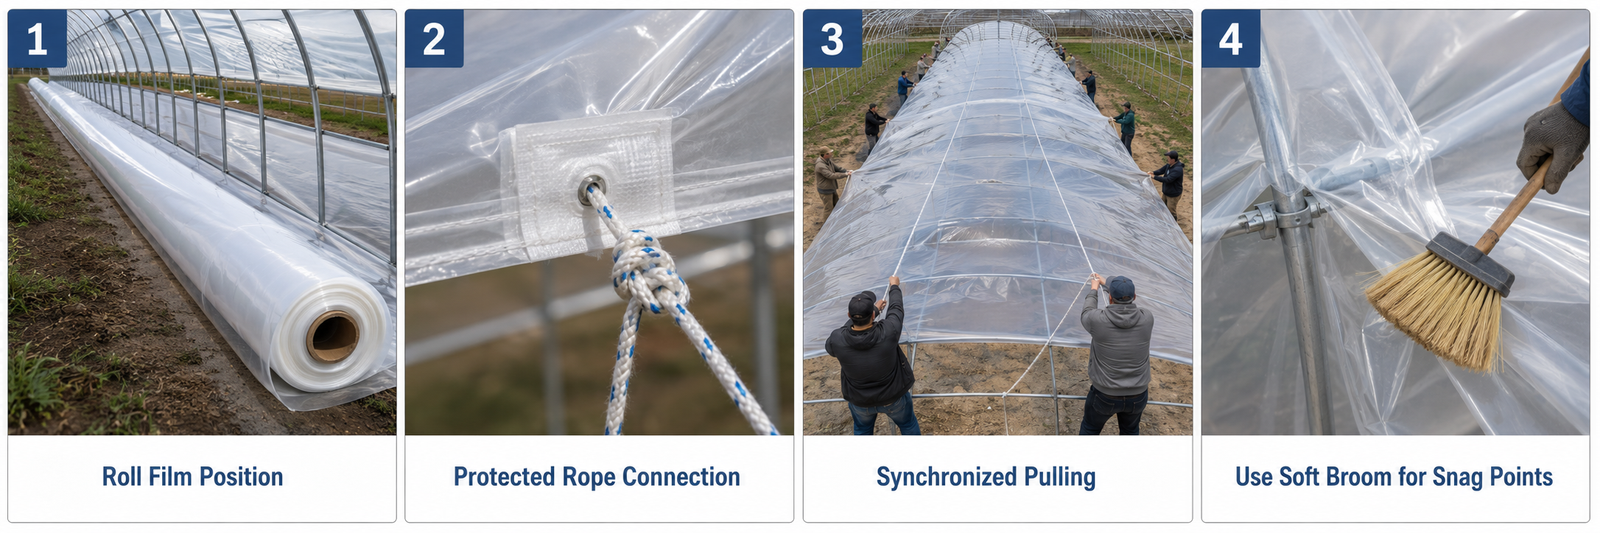
Pull the film steadily with synchronized crew movement and protected tools.
Step 5: Center and square the film
Before permanent fastening, check:
- Similar working allowance on both sides
- Adequate material at both ends
- A straight selvage or printed edge
- The fold or centerline aligned with the structure
- No section trapped under hardware
- Correct film orientation
Do not chase every small wrinkle yet. First make the full sheet square to the structure.
Step 6: Temporarily secure key points
Use short spring-wire sections, approved clamps or the greenhouse manual's temporary method. Secure enough points that a wind change cannot lift the film, while leaving the sheet adjustable.
Temporary points should not:
- Puncture the useful roof area
- Create a concentrated tear point
- Lock the film so tightly that it cannot be centered
- Be mistaken for the final fastening system
Step 7: Remove lengthwise slack
With one end established according to the system, pull the opposite end to remove large lengthwise wrinkles. Keep the pull even across the width.
Watch the edges and centerline. If one side advances faster, release and correct it before permanent fastening.
Step 8: Tension across the structure
Work in a controlled sequence between sides or from defined center points according to the greenhouse design. One worker can maintain smooth, even tension ahead of the worker installing spring wire or battens.
The objective is:
- No large sagging pockets
- No uncontrolled flapping
- Even contact with the frame
- No concentrated stretching at one edge
- Enough remaining adjustment for openings and final inspection
Do not pull against an already trapped corner until the film turns white or begins to neck down.
Step 9: Complete the perimeter fastening
Install the final spring wire, battens or approved fasteners. Check each channel run for:
- Fully seated wire
- No sharp wire end against the film
- Smooth channel joints
- No skipped or loose sections
- Correct overlap where more than one layer enters the track
For battens, check that the strip clamps continuously and does not cut the film along its edge.
Step 10: Finish end walls and openings
Secure the end-wall perimeter before cutting out doors, fans or vents. Work wrinkles away from a central reference point and toward the perimeter.
Only cut an opening after:
- The surrounding film is secured
- The frame and channel are complete
- The opening can no longer shift
- Enough material remains for the required overlap or seal
Cutting a door too early can remove the material needed to correct an uneven end wall.
Step 11: Inspect before trimming
Do not trim to the final edge immediately after the first side is secure.
Walk around and inspect:
- Side-to-side centering
- End allowance
- Roof tension
- Channel engagement
- Corners and openings
- Roll-up-side travel
- Accidental punctures
- Areas rubbing against the frame
Trim only when the full installation operates correctly. Leave the adjustment allowance specified by the fastening-system manufacturer.
How to Attach Greenhouse Plastic to a Metal Frame
This section explains how to install greenhouse plastic on a commercial metal hoop house. Lock channel and compatible spring wire are the usual starting point because they provide continuous grip and allow adjustment.
Recommended sequence
- Remove welding spatter, burrs, rust flakes and sharp screw tips.
- Protect film-contact points as specified.
- Install the channel on structurally suitable frame members.
- Smooth channel joints and cut ends.
- Pull and center the film.
- Temporarily wire key locations.
- Tension the sheet in the sequence required by the greenhouse.
- Seat the spring wire completely without pinching or perforating the film.
- Inspect every transition between roof, end wall, baseboard and roll-up side.
When clips may be used
Matched clips can be useful on:
- Small round-pipe structures
- Temporary covers
- Interior partitions
- Selected sidewall or roll-bar details
- Locations specified by a kit manufacturer
Do not assume that a clip fitting the pipe is rated to hold the complete roof in design winds.
Avoid direct point loading
Driving screws directly through unsupported film creates a puncture and concentrates the load at the washer or screw head. Where a design uses screws, the film should normally be clamped by a compatible channel, batten or engineered load-spreading detail rather than treated as a bare sheet.
Do not compare fastening systems only by their product name. Check channel profile, layer capacity, substrate, screw schedule, clip diameter, coating, wind-use limitation and the exact hardware installed on the project.
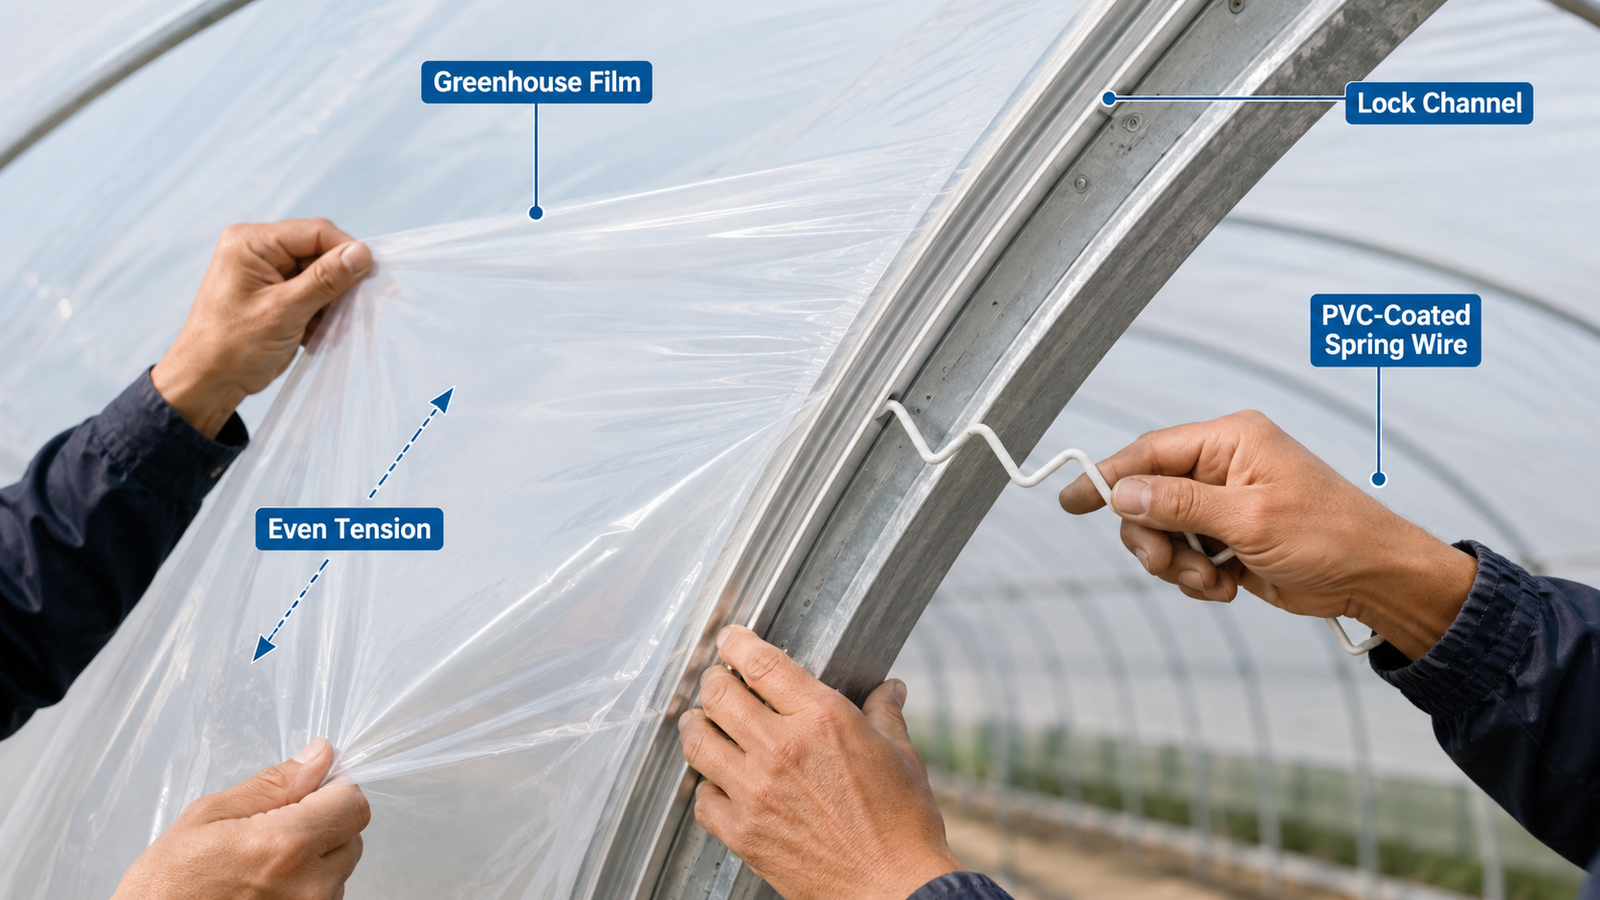
Lock channel and matching spring wire distribute the holding load along a metal frame.
How to Attach Greenhouse Plastic to a Wood Frame
Wood frames can use lock channel and spring wire, or a continuous batten system when the greenhouse design supports it.
Prepare the wood
The film-contact surface should be:
- Dry and structurally sound
- Free of splinters and sharp corners
- Smooth around joints and fastener heads
- Compatible with the selected paint, preservative or contact tape
Do not assume that every wood treatment is harmless to polyethylene. The University of Connecticut notes that contact with pressure-treated lumber and agricultural chemicals can affect film life.
Option 1: Channel and spring wire on wood
Fasten the channel to sound lumber with the hardware specified by the channel supplier. Pre-drilling may be appropriate for some wood and screw combinations, but the fastening schedule must come from the system design.
This option:
- Provides continuous film grip
- Allows release and adjustment
- Can organize film around end-wall openings
- Reduces the need to puncture the main sheet repeatedly
Option 2: Continuous battens
Place the film between the structural wood and a smooth batten. Pull the sheet evenly while fixing the batten so the pressure is distributed along its length.
Check that:
- Batten joints do not form cutting edges
- Screws enter sound framing
- Fastener heads do not protrude toward the film
- The strip does not crush or slice the sheet
- The film can be released for future replacement
Why bare staples are a weak default
Staples are quick, but a small metal crown creates a concentrated load. In exposed permanent applications, repeated movement can enlarge the puncture. If a documented system uses staples, they should be combined with the specified reinforcing tape or batten rather than scattered directly through unsupported film.
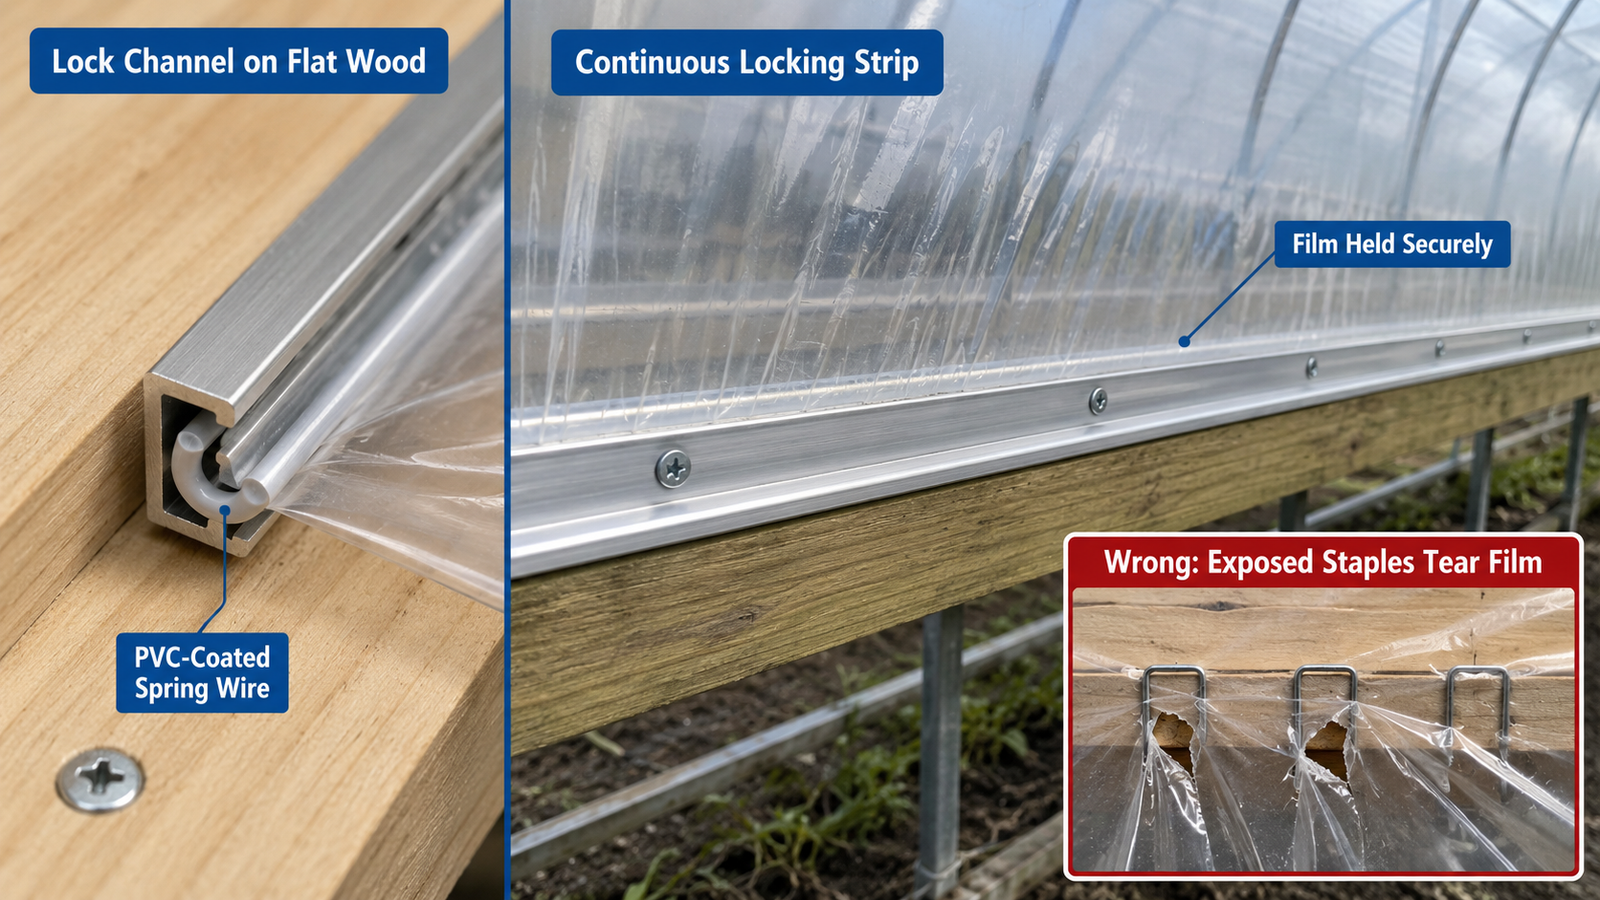
A wood frame can use compatible channel and spring wire or a smooth continuous batten.
What About PVC Frames?
PVC hoop structures are common in small and DIY greenhouses. Their installation details need separate verification.
Before fastening film to PVC:
- Confirm that the pipe diameter matches the clips or channel support.
- Check whether the film supplier requires a compatible barrier at contact points.
- Remove rough cuts, printed ridges or sharp fittings.
- Verify whether the structure and clips are intended for seasonal or permanent use.
- Do not overstate the wind or snow resistance of an unengineered PVC frame.
Some sources warn generally about PVC contact, heat or chemical interaction. Compatibility depends on the pipe, film formulation, temperature and contact treatment. Follow the film supplier's written recommendation rather than repeating a universal claim that all PVC will damage all greenhouse film.
How Tight Should Greenhouse Plastic Be?
Greenhouse plastic should be smooth and stable, with large wrinkles and sagging removed. It should not flap repeatedly against the frame in ordinary conditions. It also should not be stretched until fastening points distort the sheet.
| Condition | What you may see | What it suggests |
|---|---|---|
| Correct working tension | Smooth cover, even edges, no large pockets and no concentrated stress lines | Film is centered and load is distributed |
| Too loose | Sagging bays, repeated flapping, edge movement, wrinkles gathering at one end or water pockets | Uneven or insufficient tension, poor centering or loose fastening |
| Possibly too tight | Whitening, necking, punctures near channels, radiating stress lines or severe corner strain | Excessive tension, trapped geometry or local point loading |
Why there is no universal pull-force number
The correct force changes with:
- Film thickness and formulation
- Roll temperature
- Structure span and shape
- Single- or double-layer design
- Fastening method
- Wind and ambient conditions
The University of Kentucky's high-tunnel guide warns against pulling film so tightly that wiggle wire in the U-channel perforates the new plastic. That is a useful quality principle, not a substitute for the film manufacturer's installation limits.
Recheck before final trimming
Temperature and the fastening sequence can change the apparent tension during the installation period. Inspect the cover again before trimming, and follow the manufacturer if a later adjustment is required.
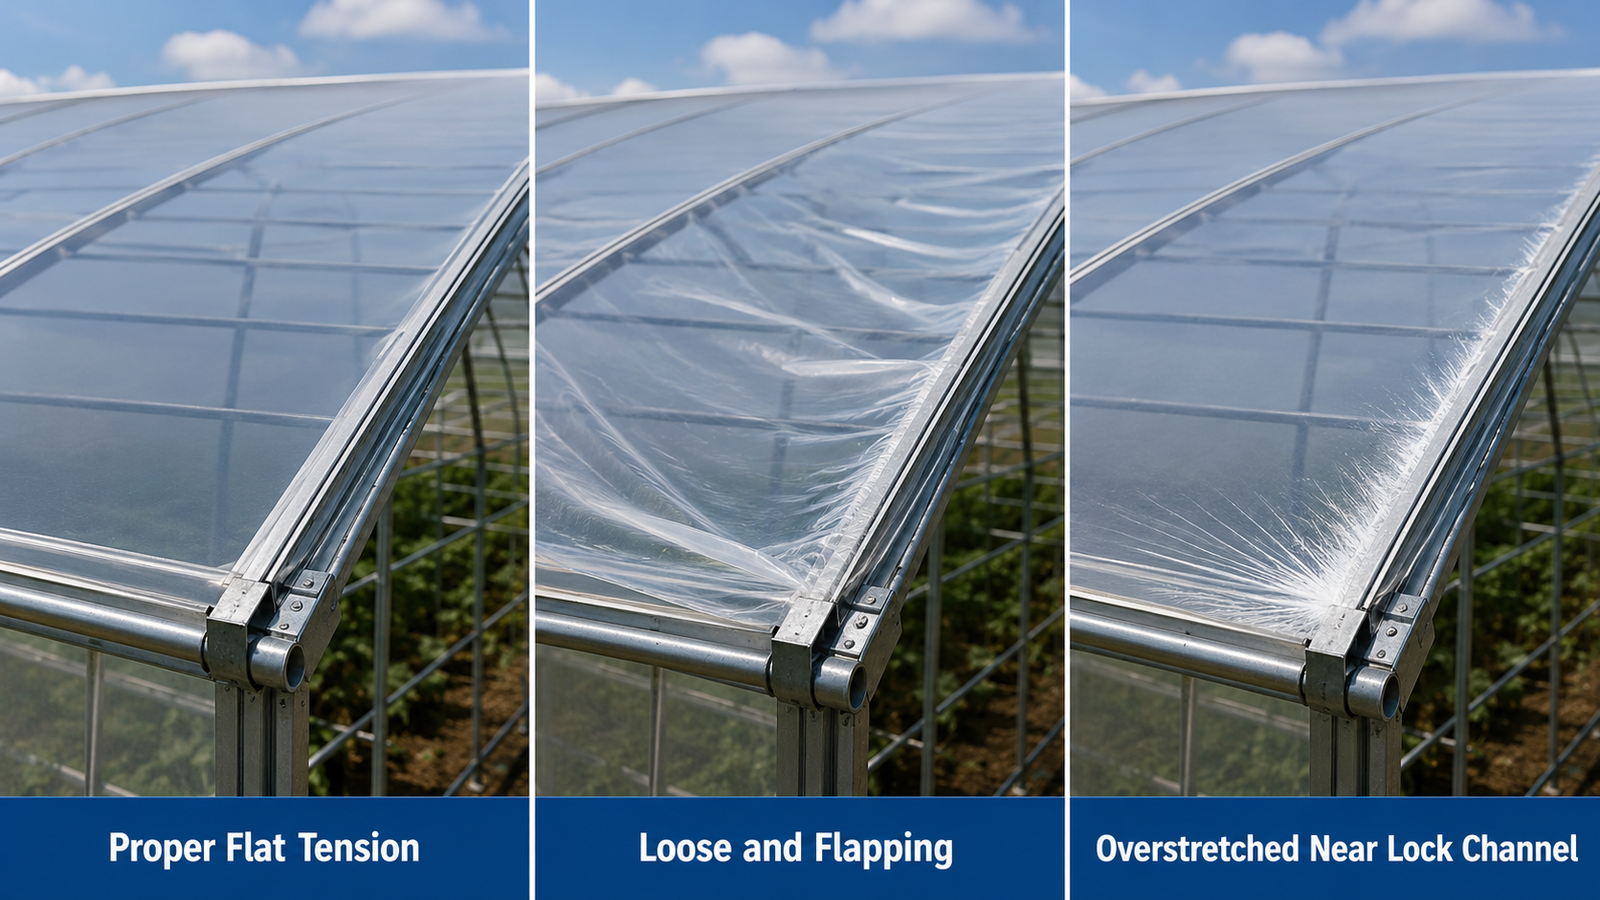
Correct tension avoids both loose flapping pockets and over-tight stress at attachment points.
Install End Walls, Doors and Roll-Up Sides
The roof, end walls, openings and roll-up sides are related but separate attachment paths.
End walls
A reliable sequence is:
- Position the end-wall sheet with enough working material around the perimeter.
- Establish a center reference.
- Secure the outside perimeter.
- Work wrinkles outward in a controlled pattern.
- Secure door, fan and vent frames.
- Confirm the sheet is stable.
- Cut openings only after the surrounding attachment is complete.
The exact order can change when the roof and end-wall films share the same channel. Follow the channel capacity and greenhouse manual.
Doors, fans and shutters
Treat every opening as a potential stress concentration.
Check:
- Smooth frame corners
- Continuous fastening around the perimeter
- Adequate overlap before cutting
- Free movement of doors, shutters and louvers
- No exposed screw or channel end touching the film
- A drainage path that does not trap water against the film
Roll-up sides
A roll-up side typically includes:
- Upper attachment rail
- Sidewall film
- Roll bar and couplers
- Crank or drive system
- End guides
- Anti-billow rope or another restraint when specified
Test the wall from fully closed to fully open. The film should roll evenly without walking toward one end, binding at an opening or pulling against the roof attachment.
UNH Cooperative Extension provides separate visual demonstrations for covering a greenhouse and assembling roll-up sides, which reflects an important design principle: the roll-up mechanism deserves its own installation and functional test.
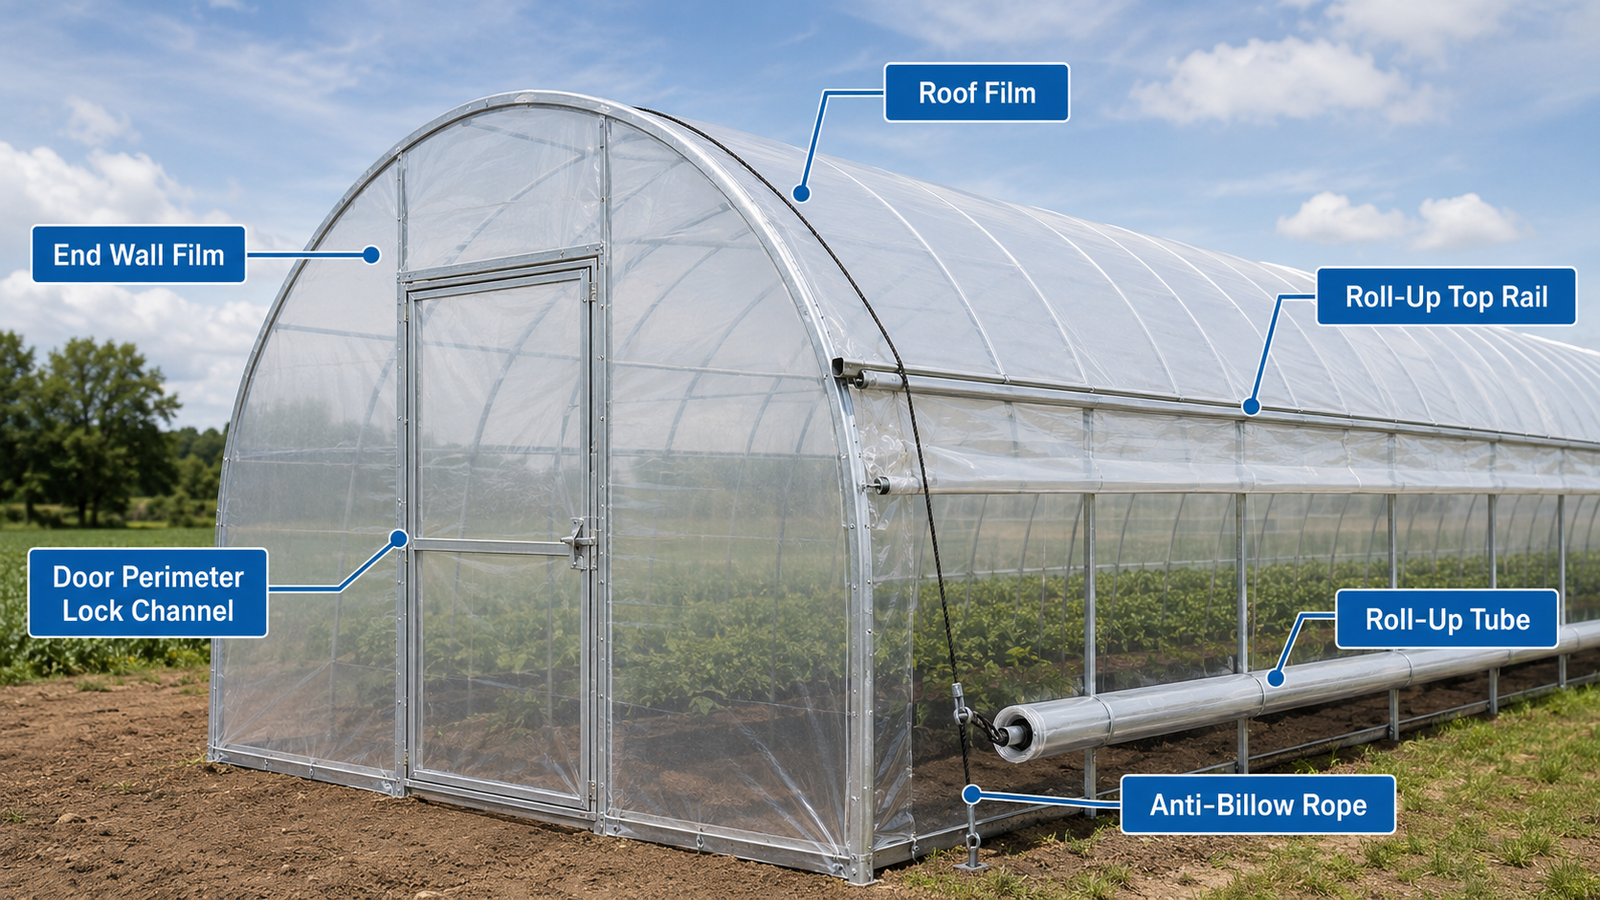
Treat roof film, end-wall film, openings and roll-up sides as coordinated attachment zones.
How to Install Double-Layer Greenhouse Plastic
An inflated double-poly system creates an insulating air space between two film layers. Its performance depends on separation, sealing and continuous blower operation.
1. Confirm the film combination
Ask the supplier:
- Which film is the outer layer?
- Which film is the inner layer?
- Is the anti-drip surface oriented toward the greenhouse interior?
- Is an IR or thermal film required as the inner layer?
- Are both layers compatible with the selected channel and wire?
UConn notes that IR film is placed as the inner layer in double-poly installations to retain nighttime heat.
2. Prepare the perimeter and channel capacity
The two layers must be attached and sealed according to the greenhouse design. Confirm whether:
- One channel and wire retain both layers
- Separate channel paths are used
- The end walls share the roof-film channel
- The blower inlet requires a reinforced opening
- The perimeter can hold air without uncontrolled leakage
3. Install both layers without trapping damage
Pull each sheet with the same care used for a single layer. Remove debris between them and check that no rope, wire end or tool remains trapped.
Do not stretch the two layers so tightly that inflation cannot separate them.
4. Install the inflation blower
The blower should use outside air unless the system manufacturer specifies otherwise. Michigan State University explains that outside air reduces the risk of moist greenhouse air condensing between the layers.
The blower assembly should include the fittings and adjustment method required by the system. Protect the film around the inlet and support the blower so its weight does not hang from an unsupported sheet.
5. Inflate and verify pressure
UConn identifies approximately 1/4 inch of water static pressure as an engineering reference for double-layer film. This value is not a universal commissioning setting for every blower and greenhouse. Use the film, blower and structure manufacturers' specified range, and verify it with the appropriate manometer or pressure-measurement method.
A correctly operating system should:
- Keep the layers separated across the roof
- Avoid excessive ballooning
- Maintain stable pressure
- Limit layer-to-layer contact
- Avoid water pockets
- Remain serviceable after temperature and wind changes
6. Plan for inspection and blower failure
Check:
- Blower operation
- Inlet screen and outside-air path
- Electrical supply
- Pressure
- Perimeter leakage
- Holes or tears
- Condensation between layers
- Water accumulation
If the blower stops, the air space and much of the intended thermal benefit are lost. The inspection plan is part of the installation, not an optional maintenance extra.
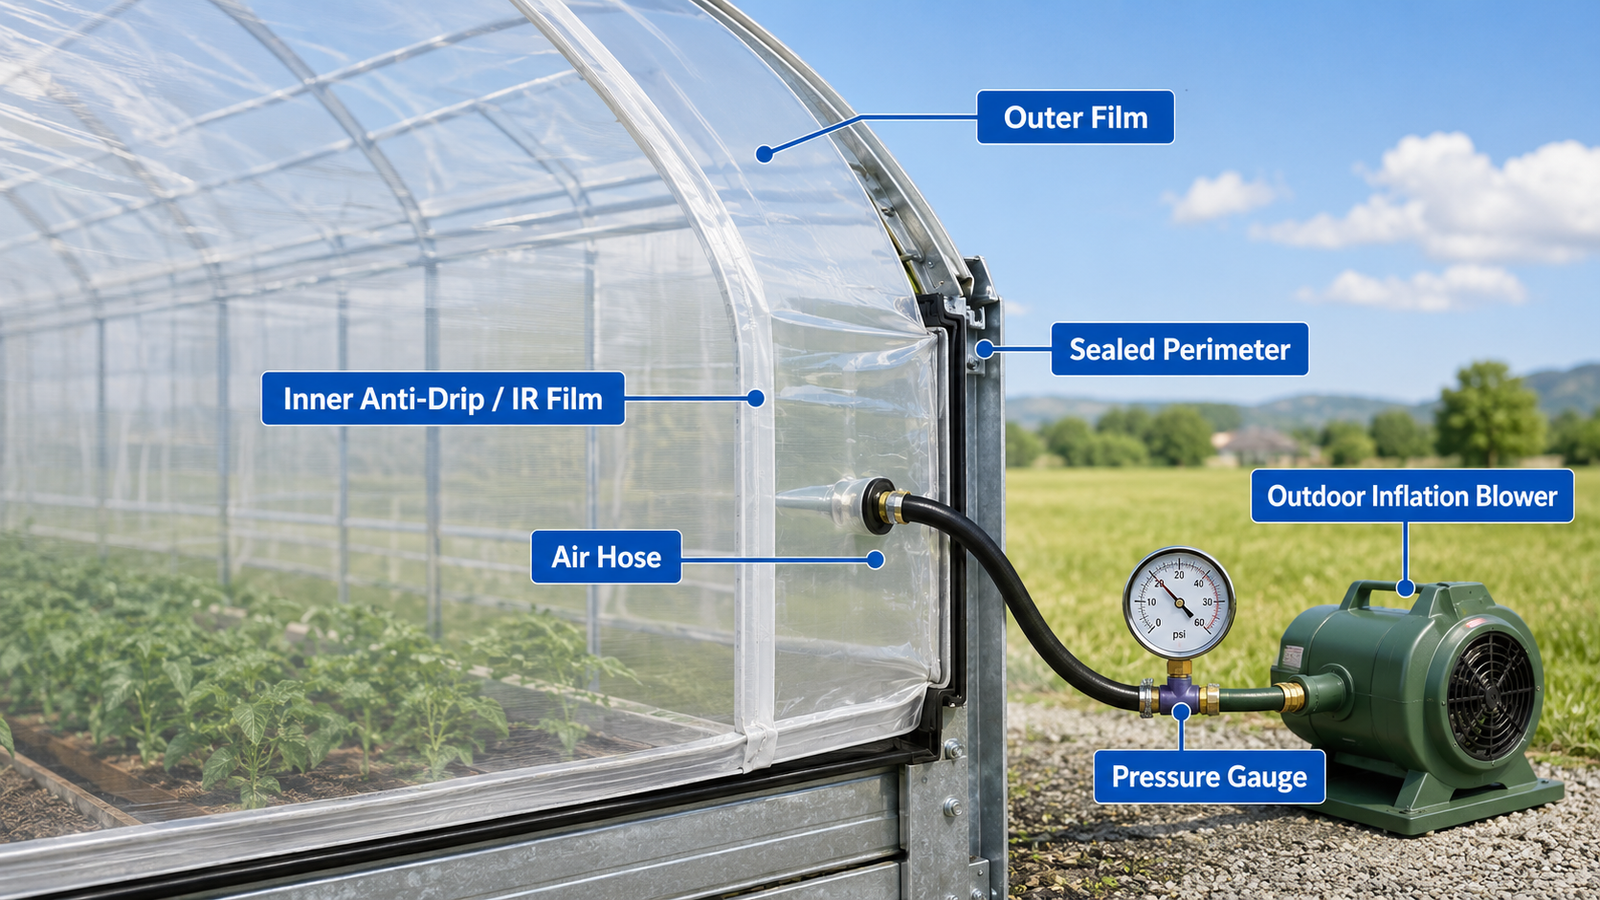
An inflated double-layer system separates two compatible films with regulated air pressure.
Common Installation Mistakes and Early Failure
| Symptom | Likely cause | Inspect | Corrective principle |
|---|---|---|---|
| Tear follows a bow or purlin | Rough contact, heat or repeated abrasion | Contact tape, welds, bolts and frame surface | Remove or isolate the damaging contact |
| Film repeatedly flaps | Uneven tension, loose edge or missing restraint | Roof bays, side channels and end attachment | Recenter or retension through the approved system |
| Tear begins at a fastener | Point loading, sharp edge or over-tension | Screws, staples, clips and channel ends | Spread the load and replace incompatible hardware |
| Wrinkles gather at one end | Sheet was not square before fastening | Selvage edges and end allowances | Release adjustable points and recenter before trimming |
| Film pulls out of channel | Wire/channel mismatch or incomplete seating | Channel profile, wire size and overlap | Use compatible components and reinstall correctly |
| Door or roll-up side binds | Opening was cut or tensioned before final alignment | Perimeter channel and moving hardware | Re-align the film and test travel before final trimming |
| Water appears between double layers | Moist inside-air inflation, leakage or drainage problem | Blower inlet, perimeter and lower film | Correct air source, pressure and damaged areas |
| Film becomes brittle unusually early | Wrong film grade, UV exposure, chemicals or heat | Product label, spray practices and contact points | Identify the cause before replacing with a thicker film |
Do not solve every failure by buying thicker plastic
A thicker film may resist some puncture or handling damage. It does not automatically correct:
- A sharp bolt
- An incompatible fastener
- Poor channel engagement
- Incorrect layer orientation
- Loose film movement
- Chemical exposure
- An inadequately engineered structure
The failure location usually provides more useful evidence than the nominal thickness alone.
If the existing cover shows brittleness, cracking, repeated tears or declining optical performance, use the greenhouse film replacement guide to decide whether repair or planned replacement is the safer action.
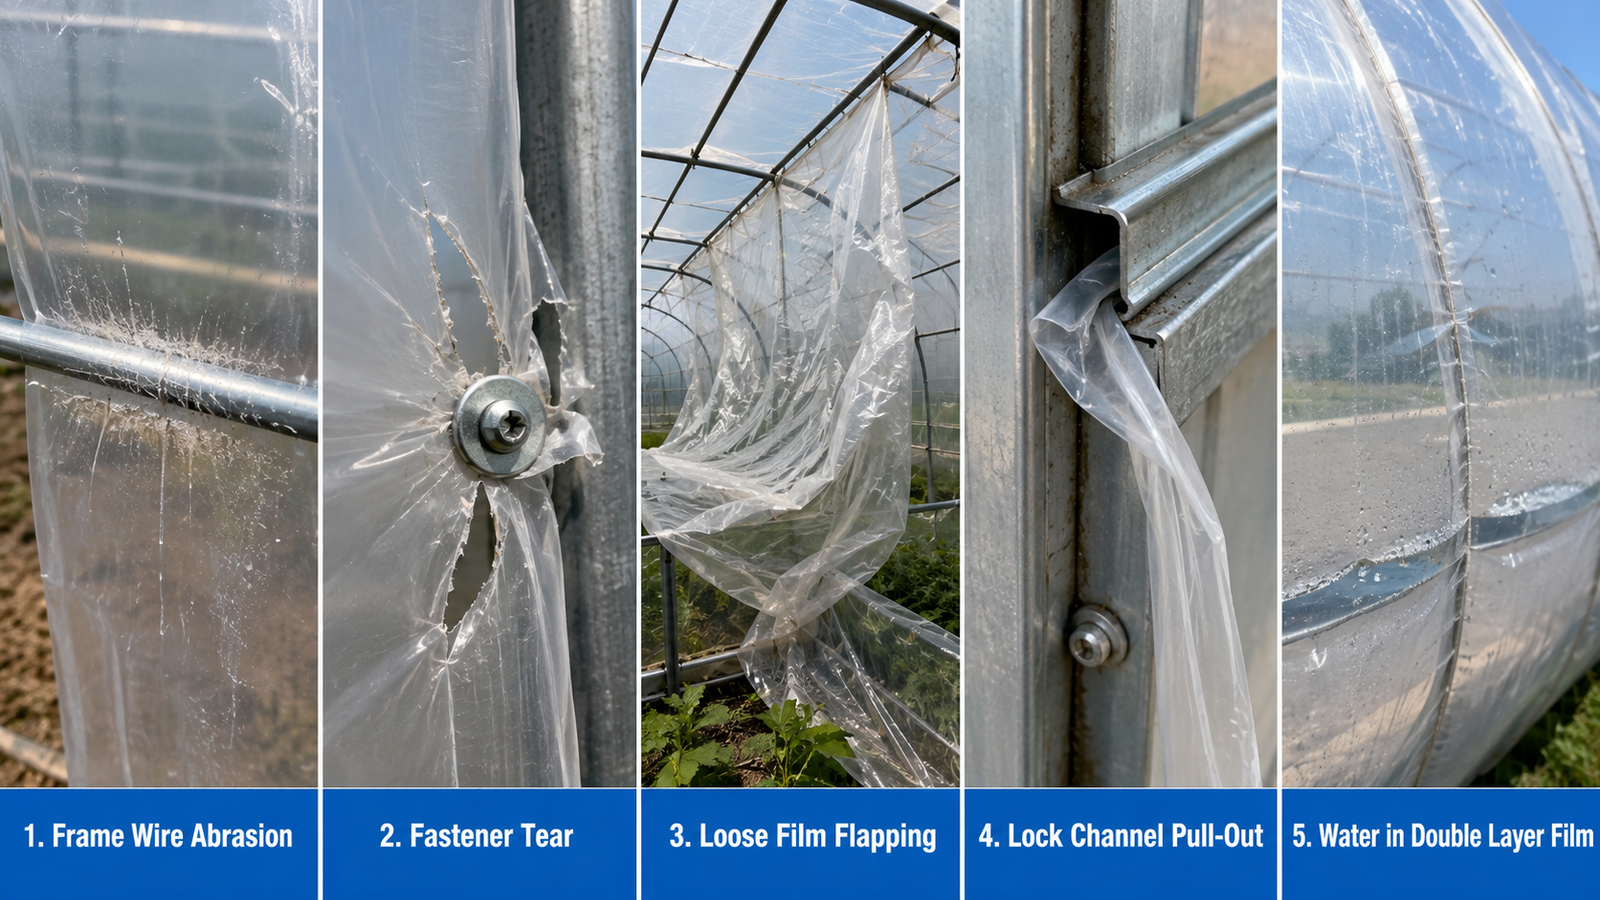
Abrasion, concentrated fastener loads, poor tension and incorrect inflation can cause early failure.
Final Installation Inspection Checklist
Film and layout
- Product, roll number and batch were recorded.
- The correct film surface faces inside and outside.
- Roof and end-wall sheets are centered.
- Required adjustment material remains before trimming.
- No packaging damage or installation cuts remain unrepaired.
Frame contact
- Bows, purlins, bolts, channel ends and openings are smooth.
- Film-compatible protection is installed where required.
- No screw tip or wire end contacts the sheet.
- No film section rubs continuously against an untreated edge.
Fastening and tension
- Spring wire is fully seated.
- Battens clamp continuously without cutting the film.
- Clips match the pipe and intended use.
- The film has no large sagging pockets.
- No area shows severe whitening or concentrated stretch.
- Edges do not move inside the fastening system.
Openings and ventilation
- Doors open and close without pulling the film.
- Fans, shutters and vents operate freely.
- Roll-up sides travel evenly from end to end.
- Anti-billow components are fitted where specified.
Double-layer system
- The inner and outer films are in the correct positions.
- The blower draws from the specified outside-air location.
- Layers remain separated.
- Pressure is within the system manufacturer's range.
- No leak, condensation pocket or trapped water is visible.
Records
- Installation date and conditions were recorded.
- Photos document corners, channels, openings and blower setup.
- Film, fastener and greenhouse manuals are stored with the project record.
- Warranty-sensitive installation requirements were checked.
Reinspect After Installation
Installation is not complete when the last wire or batten is fitted. Reinspect the cover after it has experienced a meaningful temperature change and again after the first strong-wind event that is safe to assess. Greenhouse film can relax as it warms, while cold conditions can increase tension.
Check for new edge movement, flapping, wrinkles, wire that has lifted from the channel, fastener movement, abrasion marks, water pockets and stress lines around corners or openings. Correct the cause before damage spreads. Retension only through the approved fastening system; do not pull an isolated corner harder to hide a larger alignment problem.
Record the inspection date, weather, photographs and corrective work. For a commercial greenhouse, these records help separate an installation issue from film damage, structural movement or later chemical exposure.
Frequently Asked Questions
What is the best way to attach greenhouse plastic to a metal frame?
Lock channel and compatible spring wire are the common starting point for permanent or semi-permanent metal hoop-house film because they provide continuous grip and allow adjustment. Clips, double channel, battens or anti-billow systems may be appropriate in specific locations. Use hardware designed for the frame and expected load.
How do you attach greenhouse plastic to a wood frame?
Install a compatible lock channel on sound, smooth lumber, or clamp the film with continuous battens that spread the load. Avoid treating unsupported bare staples as the default permanent roof attachment because they concentrate stress at each puncture.
How much extra greenhouse plastic should I order?
Measure the distance over the outside of the structure between the final attachment points, then add the allowance required by the side, end and roll-up system. There is no single extra dimension suitable for every greenhouse. Confirm the allowance before the roll is produced or cut.
Which side of greenhouse plastic faces out?
Follow the roll label, printed edge and supplier instructions. Some films are symmetrical, while anti-drip, IR and other multi-layer films can have a specified inner or outer surface. Do not rely on a universal logo rule.
How tight should greenhouse plastic be?
The cover should be smooth and stable, without large sagging pockets or repeated flapping. It should not be stretched until the sheet whitens, necks down or tears near channels, fasteners and corners.
Can greenhouse plastic be installed in cold weather?
It may be possible if the film and fastening manufacturers allow it, but polyethylene temperature affects handling and final tension. Avoid conditions in which the film is stiff, icy or difficult to control, and account for later expansion as temperatures rise.
Can I install greenhouse plastic alone?
A very small cover may be manageable with suitable equipment, but large greenhouse sheets normally require a coordinated crew. Do not attempt an installation when one person cannot control the sheet, access equipment and temporary fastening safely.
Are greenhouse plastic clips suitable for a permanent roof?
Only when the clip and greenhouse manufacturer rate them for the pipe, film, location and expected load. Many clips are better suited to small structures, temporary covers, sidewalls or interior uses than to a large permanent roof.
Can I staple greenhouse plastic directly to wood?
Direct staples puncture the film and concentrate force. Where staples are part of a documented system, use the specified reinforcing tape or batten. For permanent exposed covers, continuous battens or lock channel generally provide a more controlled load path.
Do I install the roof film or end-wall film first?
The sequence depends on whether the roof and end-wall sheets share a channel. Many systems position and secure the roof film before finishing the end walls, but the greenhouse manual should define the overlap and wire order.
How do you install double-layer greenhouse plastic?
Install compatible inner and outer layers, seal and fasten the perimeter, fit an inflation blower with the specified outside-air inlet, then regulate and verify the pressure. The layers must remain separated without excessive ballooning or water accumulation.
Should the inflation blower use inside or outside air?
University greenhouse-engineering guidance generally recommends outside air because warm, humid greenhouse air can condense between the layers. Follow the blower and greenhouse-system instructions for the actual inlet design.
About the Author
Sean is the author of TIANFENG's greenhouse-film technical guides, with a focus on film specification, finished roll dimensions, installation compatibility, quality records, packing and B2B project requirements. Structural design, site safety and fastening loads must still be approved by the responsible greenhouse, hardware and installation professionals.
Need a Custom Greenhouse Plastic Roll?
Correct installation begins with a roll that fits the structure and the fastening plan. When requesting a quotation, provide:
- Greenhouse type and frame material
- Distance over the bows between final attachment points
- Greenhouse length
- End-wall dimensions
- Single- or double-layer design
- Roll-up-side requirements
- Installation climate
- Crop and growing season
- Required UV, anti-drip, anti-fog, thermal or diffusion functions
- Quantity and destination
Review the available custom greenhouse plastic roll specifications or compare other greenhouse film options before ordering. A dimensioned structure drawing and attachment-system details produce a more reliable film specification than ordering by greenhouse floor width alone.
If the structure dimensions and fastening plan are ready, send them through the greenhouse film specification and quotation form. Ask the supplier to return the producible finished width, length, roll weight, fold, orientation markings, packing method, TDS and installation-related warranty conditions before the purchase order is finalized.
References and Sources
- USDA NRCS: Seasonal High Tunnel System for Crops
- University of Kentucky: High Tunnel Resource Guide
- University of Nebraska-Lincoln: High Tunnel Construction
- New Mexico State University: High Tunnel Hoop House Construction
- University of Connecticut: Plastic Film Update
- Michigan State University: Greenhouse Energy Conservation Strategies
- Penn State Extension: High Tunnel Production
- UNH Cooperative Extension: Covering a Greenhouse or High Tunnel
- UNH Cooperative Extension: Assembling Roll-Up Sides
- OSHA: Ladder Safety
- ACF Greenhouses: Greenhouse Plastic Installation Tips
- Tunnel Vision Hoops: Greenhouse Top-Cover Installation Order